Friday, March 30, 2012
Spring plant sale
I just read in the paper about a spring plant sale that UCR is putting on for the next two days. It looks like they have over 10,000 plants for sale, including heirloom vegetable plants! I'm thinking of checking it out, if we have time. Tomorrow is a busy day. If you feel like taking a drive out to Riverside, there will be a ton of plants available, including local, drought resistant plants. You can find more information here. Have a great weekend!
Thursday, March 29, 2012
Granola Bars
 I finally succeeded in making a yummy granola bar! I've been playing with different ingredients and found some that I like. I started with a recipe from here and added some stuff and took some out. This one I made for a snack to munch on during the day. They say to use steel cut oats for granola bars so they will hold together better. I have been unable to find any in local grocery stores, maybe because I'm blind and am just missing them. For these I used rolled oats, but got the quick cooking kind because they are smaller. It held together ok, but I am going to try to hunt down some of the steel-cut variety. The beauty of this recipe is that you can use it to make the bars OR the cereal. I was excited by this because I LOVE granola, but it is expensive so I never buy it. I don't know why it is so pricey. The ingredients are not expensive. Enough with my rambling and on with the recipe!
3 1/2 c rolled oats
1 c sliced almonds
1 c peanuts
1 c unsweetened coconut
1/2 c sunflower seeds
1/2 flax seeds
1 bag chocolate chips (the darker chocolate is better, but any will do)
6 T butter
1/2 c honey
2 t vanilla extract
Preheat oven to 250 and cover a baking sheet with parchment paper. Mix oats almonds, peanuts, coconut, and seeds in a large mixing bowl. Heat the butter and honey together in a small sauceoan over low heat. Once the butter melts, stir in the vanilla. Pour the hot liquid over the dry ingredients and stir until evenly coated. Spread mixture onto prepared pan in one even layer. Bake for 1 hour 15 min. It will become crisp as it cools. You can break into large pieces for bars or smash it in a ziploc bag for cereal.
The recipe is so versatile you can really put whatever you want in it. I've heard you can put a little oat flour in it to help it stick together if you want bars. I'm going to try it with raisins and cinnamon and other dried fruits that I come across. The flax seeds are an added bonus, too. They are rich in health promoting fatty acids. And there is no coconut flavor from the coconut if you are not a coconut fan.
What do you like in your granola?
Wednesday, March 28, 2012
Crushed Tomatoes
Earlier this week I was given a bunch of these:
 I knew I wasn't going to be able to use them all before they went bad, so I tried canning some of them. I already used canned crushed tomatoes when I make spaghetti sauce so I thought it would be perfect to try to make these into crushed tomatoes. I looked online to see how to do it and found the National Center for Home Food Preservation. It had some good tips and instructions so I gave it a go.
First I dropped the whole tomatoes in boiling water.
 I left them in there until the skin split and then put them right into cold water.
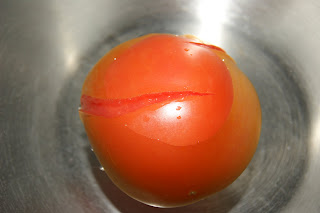 Once they were cooled off enough to handle, I just slid those skins right off. I cut out the hard part at the top of the tomato and then cut it in half. I tried to get most of the seeds out, but then I got lazy toward the end, so there were still quite a few seeds in there.

Next, I put them all into a pot and heated them up while smashing them with my potato masher. I stirred and smashed until it started boiling.

The tomatoes started falling apart as they got hot and turned into a chunky bubbling sauce. I boiled them for about five minutes. Next, I got my clean, quart size canning jars and put two tablespoons of lemon juice in each one to raise the acid level. Then I poured the hot crushed tomatoes into the jars.

I had almost enough to fill both jars. Usually, they say you're supposed to be pretty exact with canning, but I didn't have enough to be exact. I canned them anyway and I'll keep a close eye on them to make sure they stay ok. I pressure canned the tomatoes at 10 lbs of pressure for 15 minutes and let them cool.
 I can't wait to try these out next time I make spaghetti sauce. It really didn't take much time and I'm hoping the flavor is good too.
If you do not have a pressure canner, I would recommend looking into getting one. It's great for preserving the harvest from your garden and you don't need electricity to keep it in good shape. I'm hoping we get lots of tomatoes this year, so I can keep a lot of jars of crushed tomatoes on hand.
 I knew I wasn't going to be able to use them all before they went bad, so I tried canning some of them. I already used canned crushed tomatoes when I make spaghetti sauce so I thought it would be perfect to try to make these into crushed tomatoes. I looked online to see how to do it and found the National Center for Home Food Preservation. It had some good tips and instructions so I gave it a go.
First I dropped the whole tomatoes in boiling water.
 I left them in there until the skin split and then put them right into cold water.
 Once they were cooled off enough to handle, I just slid those skins right off. I cut out the hard part at the top of the tomato and then cut it in half. I tried to get most of the seeds out, but then I got lazy toward the end, so there were still quite a few seeds in there.
Next, I put them all into a pot and heated them up while smashing them with my potato masher. I stirred and smashed until it started boiling.

The tomatoes started falling apart as they got hot and turned into a chunky bubbling sauce. I boiled them for about five minutes. Next, I got my clean, quart size canning jars and put two tablespoons of lemon juice in each one to raise the acid level. Then I poured the hot crushed tomatoes into the jars.

I had almost enough to fill both jars. Usually, they say you're supposed to be pretty exact with canning, but I didn't have enough to be exact. I canned them anyway and I'll keep a close eye on them to make sure they stay ok. I pressure canned the tomatoes at 10 lbs of pressure for 15 minutes and let them cool.
 I can't wait to try these out next time I make spaghetti sauce. It really didn't take much time and I'm hoping the flavor is good too.
If you do not have a pressure canner, I would recommend looking into getting one. It's great for preserving the harvest from your garden and you don't need electricity to keep it in good shape. I'm hoping we get lots of tomatoes this year, so I can keep a lot of jars of crushed tomatoes on hand.
Monday, March 26, 2012
Swiss Chard
 I never know what to do with swiss chard. I buy it every week and have tried several different ways to cook it. A few weeks ago, I found a recipe off the Food Network website from Rachael Ray that was really yummy (I think mostly because there's bacon in there). I feel good about eating my greens with lots of rice and bacon.
2 T extra-virgin olive oil
3-4 slices of bacon
2 cloves garlic, minced
1 small bunch swiss chard, stemmed and chopped
nutmeg
salt and pepper
1/2 t paprika
1 c rice
1 3/4 c chicken stock
Heat oil in a saucepot over medium heat. Add the bacon, cook two minutes, then add the garlic and stir one minute. Add the chard and season with a little nutmeg, salt, pepper, and paprika. When the chard is wilted add the rice and stir one minute more. Add chicken stock and bring to a boil. Reduce heat and simmer and cover the pot. Cook 15-18 minutes, or until the rice is tender. Fluff with a fork and serve.
Friday, March 23, 2012
The Strawberries are FINALLY here!
 I have been waiting all year for these babies! These strawberries are the best you will find anywhere. I have yet to see any with better flavor. I make weekly trips to a strawberry stand on Simpson Rd between Warren and Winchester Rd. Most of the time there is a line, because the strawberries get sold so fast they can't pick enough to keep up. You literally see them picking them out of the field and drive them over to the stand to keep up with the demand.
 The above picture is a comparison shot of grocery store strawberries and these strawberries. Can you guess which one I bought at the stand?? If you guessed the top one, you are correct. These berries are large, juicy, and sweet, better than those hard "strawberries" in stores. Today I only got a ration of 3 baskets because they were almost sold out for the day. Those 3 baskets only cost $5 and they were overfilled. I also picked up a bag of snow peas for $1. If I can get there early enough, I'll buy a flat, which is 12 baskets, and make my grandma's recipe for strawberry jam. When that happens, I'll make some jam and post the recipe here. These strawberries make the best jam ever!
If you are considering paying this stand a visit, I recommend calling first. They are open sporadically, only when there are strawberries to sell.
Kuay's Strawberries Stand
34568 Simpson Rd
Winchester, CA 92596
(909)262-6057
*They also sell other vegetables later in the season, like red onions, among other things.
Thursday, March 22, 2012
Stromboli
 A lot of people have not heard of stromboli. In fact, I had never heard about it until maybe five years ago when I was watching some Food Network show. At it's most basic, it is a rolled up pizza. I happen to love this recipe because it uses pesto instead of pizza sauce. And this time, instead of regular pesto, I used kale pesto! (I'm really proud of that one.) It's a little time consuming to make but well worth it. It's the one meal the WHOLE family devours, babies, toddlers, and picky preschoolers included. I've adapted it a lot from a recipe in a Cooking Light cookbook. In fact, it's probably it's own recipe now. I double the recipe and make two for our hungry little family.
1 c warm water
2 1/2 t yeast
3 c flour (if you're feeling especially healthy, you can substitute wheat flour for some of it. The most I've done is half and half)
1 T sugar
1/4 t salt
1/3 - 1/2 c pesto (or kale pesto)
2 cups shredded mozzarella cheese
1 roasted red bell pepper (I fire roast mine on a cast iron skillet with some oil)
1/2 lb cooked Italian sausage
1/4 package pepperoni
1 egg, beaten
(Really you can put any toppings you like in there. Mushrooms and other peppers would be good, as are olives.)
Combine warm water and yeast in a large bowl and let stand for five minutes. Add 3 cups of flour, sugar, and yeast and mix together to make a dough. I use the dough hook on my Kitchen Aid. Knead until smooth and elastic, adding enough flour to prevent dough from sticking to hands, although the dough should feel a little sticky. Place dough in a large greased bowl, turning to coat the top. Cover and let rise in a warm place one hour, or until doubled in size. Punch dough down and let rest for 5 minutes.
Roll dough out into a large rectangle and spread pesto on top, leaving about a one inch border around it.

Then cover pesto with cheese and other toppings. Roll everything up, like you would a cinnamon roll, pinching the seams together on the bottom and sides. You should have a nice long roll. Cut 3 or 4 slits in the top, using a sharp knife. Cover and let rise for thirty more minutes. Brush top of roll with a beaten egg.
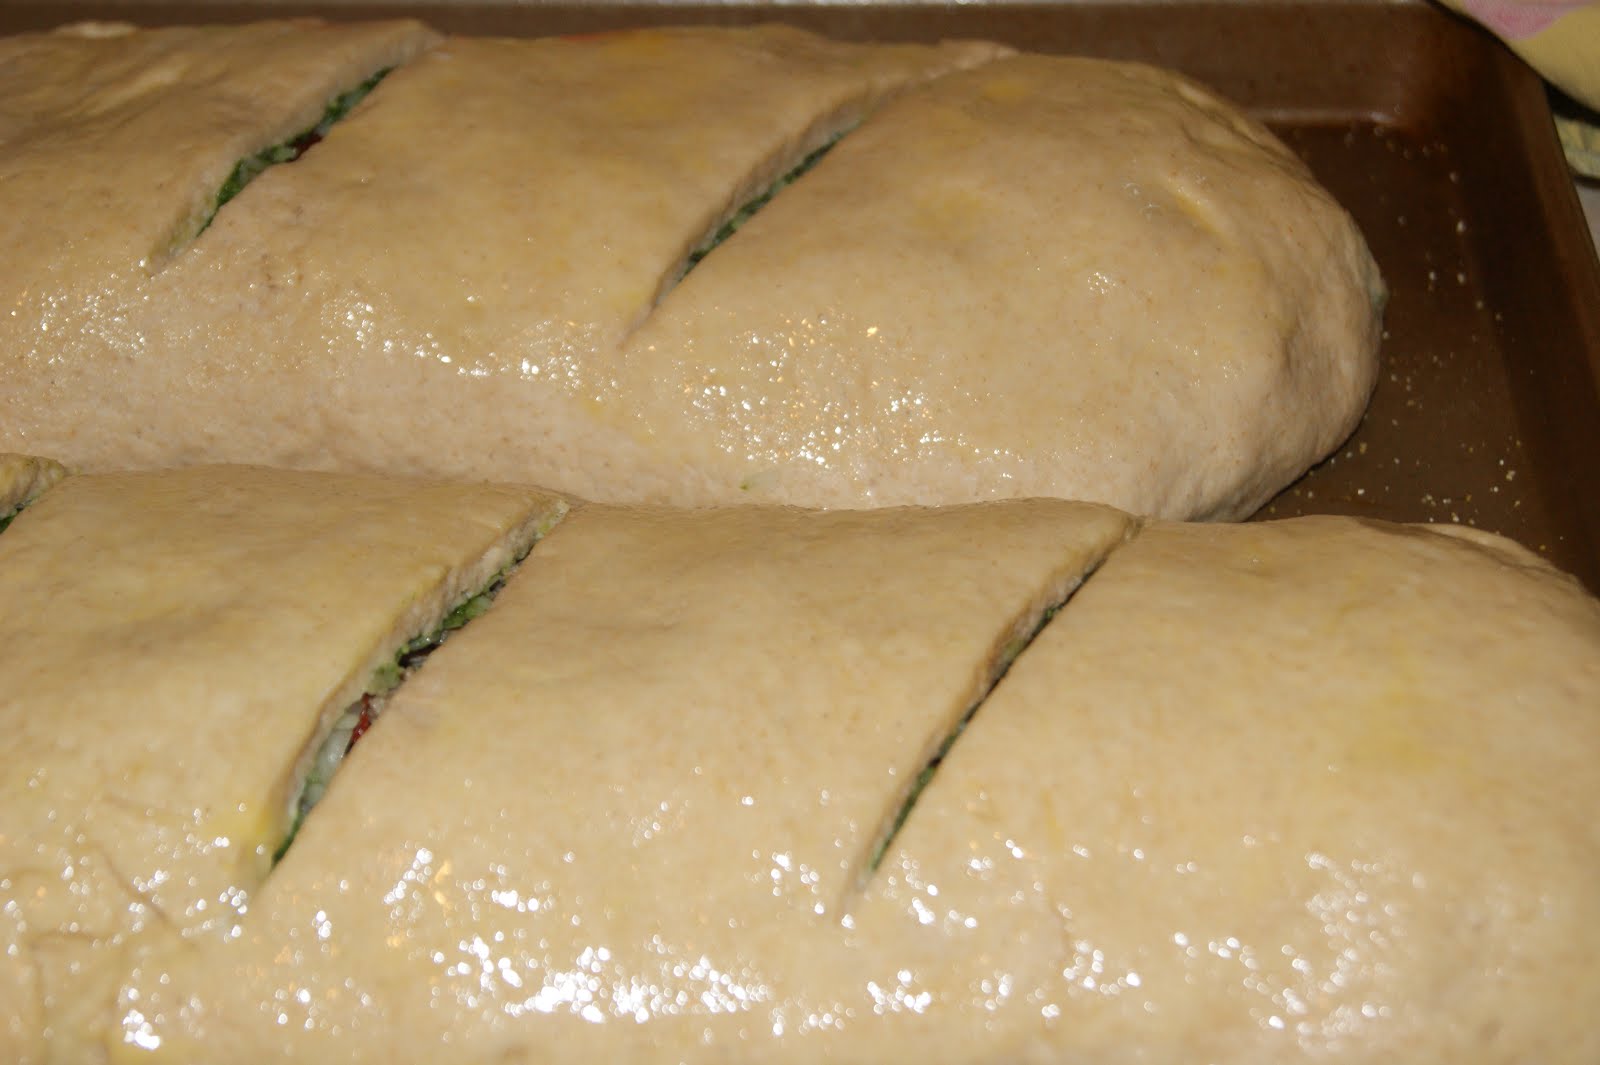
Bake at 350 for forty minutes. Let stand 10 minutes before slicing.

Remember, I doubled this recipe to make two rolls. And I'm sure you could make this with normal pizza sauce, but I think the pesto makes it just a little more special. Enjoy!
*Happy Birthday to my little Charlie! Congratulations on surviving your first year with Craig and I as your parents!
Wednesday, March 21, 2012
Kale Chips

Since I'm learning to do all kinds of things with kale, I thought I'd share with you how I figured out how to make kale chips. They seemed easy enough. Cover in olive oil and bake, right? Wrong!! I took me a few tries to get the texture just right. The key is to tear the leaves into small pieces and to not put too much oil on them - that will make it a soggy mess! If you can get it just right, the results are amazing. It really is just like potato chips, the same crunchy, salty treat, but with all the added nutrition of kale. I found my recipe on glutenfreegirl.com. I mostly use the recipe except she uses fancy smoked paprika and I just use regular. Still tasty.
1/2 t salt
1/4 t paprika
1/4 t garlic powder
1 bunch of kale
1 T olive oil
Preheat oven to 350 and line baking sheet with foil. Combine salt, paprika, and garlic in a small bowl. Wash kale and tear into small pieces. Make sure they are dry before you oil them. To oil, drizzle olive oil over leaves and massage it into every nook and cranny. Arrange the chips on the baking sheet. Be careful not to put too many on there (one of my earlier mistakes) Bake until leaves are crisp. In my oven it took about 10 minutes. Any longer and the leaves started burning. As you can see in the picture, mine had just started turning brown. Remove from the oven and sprinkle with salt mixture.
I ended up eating almost the whole batch myself. Yum!
Tuesday, March 20, 2012
It's seed time!
I was perusing my facebook account earlier today and came across a link one of my friends posted. It was a coupon site telling us about free shipping from Burpee, the seed company. I'm a total garden newbie. I've only had a garden one year where I can say I really took charge of it. I had helped with one a few years earlier, but it was not in our yard and other people ended up doing most of the work. I started with the containers last year and was semi-successful. This year I hope to be more knowledgeable about my seeds and plants.
Just within the last week, I feel I've learned a lot about plants. I learned all about heirloom vegetables and why they are better. I've also learned a little about genetic modification in plants, which is exciting and a little disturbing at the same time. It's exciting because in areas around the world in which populations couldn't grow anything can now have a sustainable source of food. It is disturbing because this kind of technology is also used to make a lot of money without regard to what they are doing to the consumer and the plant. For example, I read that in a lot of hybrid varieties of plants and seeds, the company has planted a "terminator" gene into the plant's DNA. This allows the plant to flourish when you plant it and it produces as promised. However, you can't keep the seed. If you save the seeds for the next year, they will not grow or will not produce anything, making it necessary for you to buy seeds from that company every year.
I've also read about the company that makes Round-up, a weed killer. They also own seed companies and they've genetically engineered crops to be resistant to round-up. How convenient. We buy their seeds and also their weed killer. They also have patents on these resistant plants, so if they happen to blow into your yard, you can be held liable for them being on your property without the company's permission. Something does not seem right with that.
Because I've learned this, there's a good chance I will be sticking to hierloom varieties. These have been cultivated naturally over several decades. You can save the seeds for your garden the following year with reliable results and these plants have withstood the test of time. I've got four "Mortgage Lifter" beefsteak tomatoes planted this year and I'm hoping to save some of the seeds to plant next year. I was perusing the burpee catalog and practically salivating over all the vegetables I could plant, but alas, my space is limited, so I'll have to stick with the tomatoes this year and hopefully expand next year. If you haven't got seeds for your garden yet, I recommend visiting the Burpee website today or tomorrow when you can order them with free shipping.
Monday, March 19, 2012
Kale Pesto
 Ever since I discovered the kale sold at what I know call "the farm," I've been trying to figure out ways to incorporate it into our diets. Since kale is supposed to be a super food with tons of nutrients, I figure the more I eat, the better off I am. I came across this recipe for kale pesto and was intrigued. I tried it a few nights ago and was pleasantly surprised at how good it tasted. It was not far off from regular pesto, just replacing basil and pine nuts with kale and walnuts. It makes about a cup, which goes a REALLY long way. I used about half of it with a pound of pasta and threw in some shrimp for good measure. Delicious! I found this recipe on marycrimmins.com and it's easy and quick to make.
1/2 c chopped walnuts
1 1/2 - 2 t salt
1 medium bunch of kale, stems removed and coarsely chopped
2 cloves minced garlic
1/2 c olive oil
1/2 freshly grated parmesan cheese
black pepper to taste
Toast chopped walnuts in a dry heavy cast iron skillet over high heat, stirring constantly until they start to brown and become fragrant. Or put on a baking sheet and toast at 325. Bring about 2 quarts of water to a boil, add 1 t of salt, then add kale. Cook uncovered, until tender, about 10 min. Remove from pot and drain. In a blender or food processor, add garlic walnuts and kale and blend until well combined. Slowly add oil and pulse until combined. Add 1/2 t salt and blend again. Salt more to taste. Stir in cheese and pepper.
The recipe called for old bay seasoning, which I didn't have, so I just left it out and it tasted fine. I also forgot to mix in the parmesan. I ended up grating it over my pasta and it was delicious that way. I suppose you could do it either way.
I froze the half that I didn't use and plan to use it in other recipes that call for pesto. I'm excited to try it out in other things!
Friday, March 16, 2012
Green Cupcakes
 I originally was going to post some awesome recipe today, but the two I was experimenting with did not go so well (I'm talking to you enchilada sauce and granola bars - you disappoint me). Fortunately, my sister Wendy came to the rescue. She referred me over to this blog that tells you how to make green cupcakes using spinach to color it green. I checked it out, and since I happened to have all of the ingredients on hand (I just picked up a bunch of spinach at the farm today) I went ahead and tried it. I really liked that this lady has a homemade version of boxed cakes that you can make ahead and use when you're ready to bake. My kids helped me make it and it was a fun way to celebrate St. Patricks Day.
I followed the recipe pretty closely, except I substituted 1 c of white wheat flour into the mix. I will say that blending the spinach and applesauce was a little difficult because of the lack of moisture in the blender, but I stuck it out and it eventually blended fine. I also decided to put spinach in the frosting. Why not go all the way? You're not hardcore unless you live hardcore. I used the butter-cream frosting recipe that she has a link to, and just blended a handful of spinach with the milk.
My kids thought they were pretty good. They both ate two. I have to say they weren't my favorite cupcakes, but I do like the idea of all that spinach in there. Don't get me wrong, they don't by any means taste bad, they're just different. It's definitely a great way to get some greens into your kids. You can find the recipe here.
Thursday, March 15, 2012
Live off the Land

I recently started reading the book "Animal, Vegetable, Miracle" by Barbara Kingsolver on a recommendation of a friend. I've only read the first two chapters and I'm already hooked. It's the story of how the author's family attempted to live off the land for a year, meaning they ate what they raised and grew themselves, and only bought food from local sources. I'm am impressed with their dedication. I would eventually like to get to that point, but I plan on doing it over several years, little by little. Our family's start came when I started making my own bread and then it gradually increased from there.
What I found most interesting in the book so far, was how the book describes how fuel-dependent the food industry is. According to the book, "Americans put almost as much fossil fuel into our refrigerators as our cars. We're consuming about 400 gallons of oil a year per citizen - about 17 percent of our nations energy use - for agriculture, a close second to our vehicular use." Say what?? The bulk of that use is from "the trip from the farm to your plate." Meaning, of course, that all the processing and packing and transporting the food to stores uses a ton of fuel. I had never thought of it that way. I find it interesting, that we're all trying to save on gas by getting more fuel-efficient cars and not driving as much, but we're still paying a boat-load of money to have our food prepared, packaged and delivered to us. If we really want to bring gas prices down and save the earth and all that, we should probably get back to growing and making our own food, or at least the majority of it. Can you imagine how much good would come from everyone having some kind of garden and gathering around the table for a home-cooked meal?
One way to put your money back into your community is to buy locally. I recently discovered a gem here in little old Hemet. It's a local farm that sells their organic produce every Friday. This is how it works. They harvest what is ready in the morning and set it out for you to buy in the afternoon. They also have a CSA program, community supported agriculture, meaning that you can buy a share of the farm, and receive produce as it's harvested. At this particular farm, they sell by the box, 4 boxes at a time, and you get to pick what produce you want. If you're not interested in the CSA, you can just pick and choose however much or little you want. The prices are comparable to what you would find in the grocery store, and it's organic, locally grown, and super-fresh. Plus, you are supporting people within your own community. The company is called Organics 4 Life and they operate out of the Hemet Stock Farm. You can find their website here. I've made trips on three Fridays so far and plan on going again tomorrow. Now I'm just waiting for the gas prices to start dropping...
Wednesday, March 14, 2012
Italian Sausage
I was so excited about how the Italian sausage turned out last night, that I decided to post about it today! It's really not that hard to make and I don't know why it never occurred to me to make it before. I started out with this pork butt roast. I like them because they're nice and cheap. I cut all the meat off the bone and ground it up in our meat grinder. It ended up being about three pounds of meat.

Then I added all of the spices and mixed it all together. I got the recipe from an old roommate of mine that has her own website called www.ourfoodstorage.com The Italian sausage recipe is about the 3rd post down. I tripled the recipe since I had three pounds of meat, and I used whole fennel seeds instead of ground. I have to say, I was nervous about the amount of red wine vinegar it called for. After I mixed it up, all I smelled was vinegar. Fortunately, the flavor when cooked is excellent.

I divided it up into one pound portions and froze two of the pounds in freezer bags. Then I cooked the rest and put it on a pizza for last night's dinner. It was pretty tasty.

I'm really glad this worked out, mostly because I did two extra pounds, but now I have some ready to go the next time I need some Italian sausage.
*It's not necessary to grind your own meat for this. You can use any ground meat that you have.
Tuesday, March 13, 2012
Grind your own meat
 I'm sure most of you have heard about the pink slime controversy. If not, you can find more information here. I'm not a big fan of additives to my food, so fortunately I got lucky and scored this "antique" meat grinder from some friends. It was from a grandma, I believe, and it's fun to use. Craig originally wanted it to make his own sausage, which I'm sure he will try soon. I was able to use it yesterday to grind some of my own ground beef.
I picked up this nice London Broil on sale and cut it up into small cubes after I trimmed off the fat.

Then I put the small cubes in the meat grinder, turned it on and viola! Fresh ground beef! I did my customary packing job and called it a day.
 I like the idea of being able to control how my meat is processed now. Tonight I'm going to grind some pork and make some Italian sausage. If it turns out good, you'll be hearing about it soon!
*If you don't have a meat grinder, the butcher at the grocery store can grind it for you. A lot of times, a cut of steak is cheaper than ground beef, so you can buy that instead and have them grind it. I like using London Broil because it's nice and lean and it saves the work of doing it yourself! I have seen a Kitchen-Aid attachment as well, so that is an option, too.
Monday, March 12, 2012
Baked Ziti

Some days, you just don't want to cook. When I have those days, I turn to this baked ziti recipe. I originally got this recipe from my sister-in-law, but I have modified it by using my own homemade sauce. It is delicious and you can use sauce you have already made and frozen. I use my spaghetti sauce and cauliflower alfredo.
 I take them out of the freezer and thaw them out and the rest is simple. I get a box of ziti noodles and cook them for about half the time it says on the box. Then I layer the spaghetti sauce, the alfredo (about half as much as the spaghetti sauce), the noodles, and mozzarella cheese. I usually have enough room for only 2 layers. And I usually put a ridiculous amount of cheese on there. I really like cheese. Then I top it with a little bit of freshly grated parmesan cheese and pop it in the oven. I cook it at 350 for about 30 min or until it's bubbly. You could even assemble it ahead of time and freeze it if you wanted to, it just takes a lot longer to cook. I tried it once, and was unhappy with how long it took to cook.
 The end result is cheesy, yummy noodles that my kids love to eat (and me too). It's healthy and has an insane amount of veggies in it too (cauliflower, zucchini, mushrooms, peppers, carrots, celery, or whatever you like to put in your sauce). Enjoy!
Friday, March 9, 2012
Delicious Glazed Salmon
 Now that we've discussed how great salmon is, it's time to eat some! This is my favorite recipe for salmon and, in my opinion, it's better than what you can get at most restaurants. This comes from a Cooking Light cookbook. It calls for hot Chinese mustard, but I use regular Dijon mustard. Enjoy!
3 T dark brown sugar
1 T soy sauce
4 t Dijon mustard
1 t rice vinegar
4 (6 oz) salmon fillets
salt and pepper to taste
Preheat oven to 425. Combine first four ingredients in a sauce pan and bring to a boil. Then remove from heat.
 Place fish on a foil-lined baking dish and sprinkle with salt and pepper.
Bake at 425 for 10 minutes. Remove from oven and preheat broiler. Brush sugar mixture over fish and broil 3 inches from heat for 3 minutes or until fish flakes easily when tested with a fork.
 I usually make more than 4 fillets, just because we like it so much. I just make more glaze. I'm pretty sure you can't have too much of that.
Wednesday, March 7, 2012
Natural flavors vs artificial flavors
Have you ever looked at a packaged food product and saw the ingredient, "natural flavors?" So many foods have this listed on their ingredient labels and people tend to think, that because it says "natural," it must be good for you, right?
If you're ever interested in finding out how processed food is made, Fast Food Nation by Eric Schlosser is the book for you. It goes in depth on how the fast food industry was created and how processed food is made. I must warn you, though, this book is not for weak stomachs. It will make you seriously re-consider what you choose to put in your body.

Chapter 5 of the book talks about flavorists and their job of making things taste good. These are scientists whose sole job is to combine different chemicals to create the desired flavor of processed foods, to replace the flavor lost when the food was processed. These man-made additives are either in the category of natural flavor and artificial flavor. The two are chemically the same, and both are created in labs, but artificial flavors are synthetic chemicals.
I found this article about it by Phil Lempert that goes into detail about natural flavors, including the definition under the Federal Code of Regulations. It's an interesting read and you can find it here.
It's just one more reason I like to make everything myself. I would prefer to not have so many additives in my food. Fresh is best!
Salmon
 I love me some good salmon. A long time ago, I lived in Alaska for a summer and learned all about salmon. I had always hated fish and wouldn't go near it with a 10 foot pole. After Alaska, I saw the light. I learned how delicious fresh fish is. My first taste of salmon and halibut was from the catch of a friend, which he had caught THAT DAY. I learned that fish smells fishy when it is not fresh. Unfortunately, I cannot get fresh fish from Alaska anymore. I live over an hour away from the ocean. There is a lake close by, but I have yet to go fishing there. (It's on my list of things to do this summer-apparently it is loaded with striper.) So until things change, I have learned to tolerate the fish you buy at the grocery store. A couple weeks ago, salmon went on sale, and my timing was perfect. They had just gotten their shipment of salmon within the last five minutes! So I decided to get 2 huge fillets. It ended up being about five pounds of fish.
Now, salmon is not cheap. Even on sale, it's expensive, but it is one thing I'm willing to splurge on. I think the health benefits outweigh the cost. In fact, Craig, my husband (and dietitian) told me about a review he came across while doing some research for work. It was published in the Journal of the American Dietetic Association in 2009.* It talked a lot about the roles of omega-3 fatty acids in health and disease. The most interesting section was about infant development and the role of fatty acids. The results of the study claimed that mothers who ate a lot of fatty fishes, like salmon, and had a high intake of omega-3 fatty acids while pregnant and nursing, had infants with improved visual acuity and hand-eye coordination. These fatty acids are especially important in the 3rd trimester for pregnant mothers, as the demand by the baby increases.
For me, this is just another justification for me to buy more salmon. Because I bought so much last time, (we really can't eat all that salmon in one sitting) I cut the fillets into individual portions, wrapped them in saran wrap and then sealed it in a gallon freezer bag.
 Now, whenever I need my fatty acid fix, I can just pull out the portions that we need and thaw them out. The texture of the fish is still good too. This salmon is farm-raised. I prefer the wild salmon and my husband likes the farm raised. The wild caught is more expensive, so I settle for the farm raised. I figure it's better to eat some salmon than no salmon. Stay tuned for my favorite salmon recipe tomorrow!
*A Systemic Review of the Roles of n-3 Fatty Acids in Health and Disease
NATALIE D. RIEDIGER, MSc*; RGIA A. OTHMAN, MSc*; MIYOUNG SUH, PhD, RD; MOHAMMED H. MOGHADASIAN, PhD
Journal of the American Dietetic Association 2009
Tuesday, March 6, 2012
Cauliflower Alfredo

Cauliflower and I have a complicated relationship. I want to like it so bad, but I just don't. I have tried several recipes with it and was not a fan of any of them, until I tried Cauliflower Alfredo sauce. I couldn't even taste the cauliflower! I first tried it when a friend of mine made it and I've been making it regularly since. (I'm not sure where she got the recipe, probably online) Every time cauliflower goes on sale, I'll pick some up and make this sauce, which I then use in dinner, or I will freeze it to use at a later time. It's a great way to lighten up your regular alfredo sauce, add some nutrition, and it's not difficult to make. I've used it in chicken fettuccine with broccoli and also with baked ziti. I've adapted the recipe a bit, mostly adding more garlic and cheese (I'm a cheese lover).
 Cauliflower Alfredo
1 head of Cauliflower
1 onion
4 cloves garlic
4 T butter
4 T flour
1 c half and half (I use skim milk-not quite as creamy, but still good.)
1 c chicken broth
1 c Parmesan or Romano cheese
salt and pepper to taste
Cut up cauliflower and boil in water with salt and pepper until soft with the lid on. Then cook with the lid off until the water is almost gone. While cauliflower cooks saute onion and garlic in some butter until soft. Put cauliflower in a blender and blend until creamy. Add the onions and garlic and blend well.
In a saucepan, melt the butter. Once butter is completely melted add flour and whisk. Stir in cauliflower mixture, half and half, and chicken broth as well as salt and pepper to taste. Once it is thick and bubbly add the cheese and some more salt to taste.
The trick with this recipe is to not skimp on the salt. I think that is what brings out the other flavors and masks the cauliflower taste.
Monday, March 5, 2012
Green Eggs
 Well, I tried the green eggs over the weekend, and I have to say that it was a huge success! I used spinach, green onions, and skim milk. In fact, I would have to say that I liked it so much that there's a good chance I'll be making it on a regular basis for breakfast. I made some hash browns with bacon to go with it (that was my "ham").
I've found that I really like the website I got it from. It's all about eating real food that is more a "product of nature than a product of industry." That is a lot of the reason why I started this blog and am trying to make everything from scratch. You can check it out here:
http://www.100daysofrealfood.com/
Friday, March 2, 2012
Happy Birthday Dr. Seuss!
I'm not very good with birthdays. In fact, there have been a few times that I've forgotten that it was my own birthday. So imagine my surprise when I learned today was Dr. Suess' birthday! The only reason I know this is because 1) all the facebook posts about it, 2) Story time at the library was about it, and 3)I found this recipe on a website and it is genius! Check it out.
I personally think it was a stroke of genius to use kale for the green coloring. I have been trying to figure out ways to use more greens like that and swiss chard and now I know at least one way! I'm going to try this out this weekend with some swiss chard or spinach, since I don't have any kale.
How about you guys? Do any of you know how to cook kale and swiss chard to make it yummy? I'm not much of a green leafy vegetable kind of girl, so any help I can get would be great.
Thursday, March 1, 2012
Spaghetti Sauce
 Sorry for the unattractive photo. It tastes better than it looks, I promise. I originally started making my own spaghetti sauce using Giada De Laurentiis' recipe for Marinara sauce. I've adapted it a bit to my own needs and made it a meat sauce. What's really nice, is making a double batch and freezing what you don't use, so you have it on hand for a quick meal. I freeze mine in gallon size freezer bags. It's helpful to do this since making the sauce takes some time.
Making your own sauce is also a great way to sneak some extra veggies into your meal. You can puree the veggies, chop them, or grate them, depending on how picky your kids are about chunks in their sauce. My sauce usually has carrots, celery, zucchini, sometimes bell pepper (green bell pepper definitely alters the taste, so if you don't like them, omit them), and mushrooms, not to mention a ton of tomatoes. I buy the canned crushed tomatoes. Eventually I hope to use tomatoes from my garden, but I'm not there yet. If you're looking for a nice, fresh, and light tasting sauce, this is for you. It's also good with some mozzarella cheese mixed in and some parmesan cheese on top. If you're feeling extra fancy, you can put some chopped fresh basil in the sauce at the end.
1/2 c extra virgin olive oil
2 onions, finely chopped
3 garlic cloves, minced
1 lb ground beef
2 celery stalks, finely chopped
2 carrots, peeled and finely chopped
1/2 to 1 zucchini, finely chopped
1/2 to 1 bell pepper, any color
1 8oz package mushrooms, finely chopped
2 28 oz cans crushed tomatoes
2 dried bay leaves
salt and pepper to taste
In a large pot, saute meat, onions, and garlic in oil until meat is brown and onions are translucent. Add the celery, carrots, zucchini, bell pepper, and mushrooms with salt and pepper. Saute until the vegetables are soft. Add the tomatoes and bay leaves and simmer, covered over low heat for about an hour. If you like thick sauce, you can simmer uncovered so it can thicken. Remove and discard the bay leaves and add more salt and pepper to taste.
Subscribe to:
Comments (Atom)